One hundred monsters swear allegiance to not only their native world but to a new flag that flies above their march of destruction.
One hundred warriors line up for battle.
One hundred demons rush into the enemy flanks.
I got 99 demons but a Yamigedo ain't one.
Alright, enough flavor, let's get down to business.
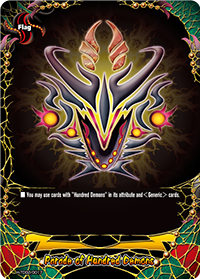
Parade of Hundred Demons marks the second time Buddyfight's had a special flag. Like Dragon Ein, this flag constricts the player into a single archetype - the Hundred Demons trait (well, and Generic). Ironically, with the advent of Omni Lords being available for any flag, you can actually make a Hundred Demon deck with all 8 Omni Lords in it. Maybe it's a sign...
.png/revision/latest/scale-to-width-down/330?cb=20151005052042) |
Call me king, call me demon - the
names of the devoured are forgotten |
Hundred Demons is an extremely strong attribute with really good spell support and solid monsters to boot. While they have the exclusive Thunder Mine ability, their gameplay is actually not very focused around it and instead play the beatdown advantage game very well.
Like the Dragon Ein article, we'll begin by exploring the flag-specific cards before tying in the rest of the support.
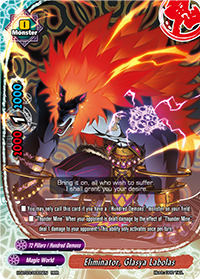
Great Fiend, Yamigedo is the final boss of the archetype. With acceptable 7000/2/7000 stats and Double Attack, Yamigedo hits the field for 2 gauge and can suck up as many on-field Hundred Demons for his Soulguard - so up to 3. So far he's -0.5, but he easily makes that up with his amazing Thunder Mine ability which deals 1 damage to your opponent if they negate one of your attacks. It doesn't even has to be his! That means that with Yamigedo, two Size 0's, and a weapon, Yamigedo's Thunder Mine has 5 chances of activating. For every time it doesn't, your opponent is taking full damage from your attack. It's reminiscent of the shot trigger effect from Weiss Schwarz, and it's even more powerful in this game.
 |
| God of Thunder |
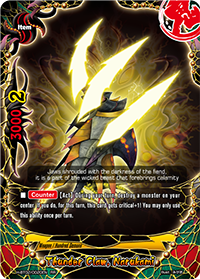
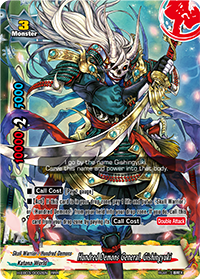
The second card is Thunder Claw, Narukami. A basic 3000/2 weapon, Narukami has the unique effect of killing your center monster as a counter Act ability for an extra crit. This means you can nuke your center on your turn and achieve 4 attacks without much hassle. You can only do this once per turn, otherwise it'd be pretty abusable. Unfortunately, this means that Narukami and Yamigedo don't actually work that well together. Yamigedo wants to tank with 3 soul but will block Narukami from attacking. This means that Hundred Demon decks actually diverge in playstyle based on which of the exclusive cards you want to maximize (you can run them together but I really don't like the idea of calling Yamigedo to the side and living with Size 0 for center shields).
If you want to make Yamigedo your main strategy, your weapon of choice is Fiendish Blade, Urahonekui. For 1 gauge and 1 life, you get a 3000/2 weapon that can attack, even if you have a center. That's fantastic for a deck that wants to have a big Size 3 there without giving up on attacks. Hungry Claw, Raiga is acceptable but extra crit is much better. You can double down on this strategy with the other choice Size 3 of the deck, Gokumengaiou. Alongside the two tanks you can run an assortment of Size 0 monsters like Dragon Tooth Warrior, Chizomegumo, and Vouivre (Chizomegumo can even be revived with Odd Ritual, Skull Festival). This is the tanking build of Hundred Demons that focuses on maximizing Yamigedo's Thunder Mine and punishing your opponent's lack of good options.
 |
| From hell we rise |
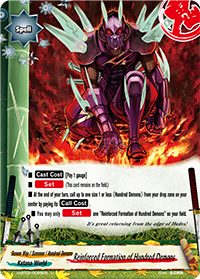
If you want to abuse Narukami as a free 3000/3 weapon, you need to run Reinforced Formation of Hundred Demons. This Set spell allows you to call any Size 1 or less Hundred Demon monster from your drop zone at the end of the turn, allowing you to recoup the card you destroyed for Narukami's ability. While this might seem like paying 1 gauge for 1 crit every turn, don't forget it also allows you to take advantage of 4 attacks and that using the effects are optional, forcing less of an investment than Urahonekui but also costing more in the long run.
Using Narukami also opens up more of the regular Thunder Mine strategies, setting up traps to punish your opponent for calling certain monsters. If you have a Thunder Mine 1, Thunder Mine 2, and Thunder Mine 3 monster on your field (Peluda-Zazamera-Vouivre), you're guaranteed at least 1 damage unless your opponent forfeits calling or calls Size 0s only. Narukami also works better with a more toolboxy beatdown style deck that Reinforced Formation promotes.
Regardless of style, both Hundred Demon decks rely on several staple and strong tools to get their game rolling.
 |
| Drop it |
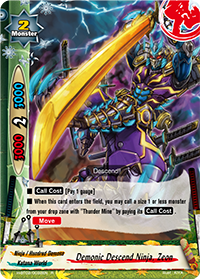
Size 2 is like the magical level, there's so many good cards there. Honorable mentions go to Orthrus and Grand Wilderness for having powerful effects. But they more or less lose out to Cocytus Greed, Gataraorochi, and Zeon. Cocytus Greed is so powerful, giving you 1 gauge while taking one away from your opponent. Having on-play disruption and ramp is huge, and Cocytus Greed even offers additional utility with his destruction ability. Gataraorochi can pop any Size 2 or lower monster for only 1 gauge. The requirement is a Hundred Demon on field, which can count your weapon, meaning that Gataraorochi goes off very easily. Finally, Zeon can summon any Size 1 or lower monster with Thunder Mine when he's called (for 1 gauge). This targets some decent Size 1 beaters and Vouivre, the latter being one of the best options for this deck. You can call Zeon to the right, grab Vouivre for the left, and then use Reinforced to get a Size 1 for your center.
Size 1 is very important as well. Living Mad Gazer synergizes really well with Reinforced, giving you a recyclable 6000 defense Size 1. Odd Bird Harpy is free gauge, don't pass that up; she also makes Reinforced free and can be activated with said Set, basically giving you extra 1 gauge every turn. Trap Master Dragon would be good but he searches for Dragon World Set only so please don't delude yourself. Kalavinka, Uguisukomachi is a Double Attack option which is pretty strong. But the most important card has to be Lindwurm.
Soaring Flame, Lindwurm gives Hundred Demons a valuable cycle card and life ramp at Size 1. You can also repeatedly call it with Reinforced to keep gaining life and drawing into important cards. Additionally, if Lindwurm is in the soul, it gives the parent monster Move, which somewhat lets Yamigedo and Gokumengaiou work alongside Narukami (but I still don't like it). Lindwurm and Harpy are basically the resource engines for Hundred Demons and make Reinforced a fantastic card, even if you're looking towards Yamigedo tank deck.
 |
| Wahaha |
Hundred Demons aren't that bad off spell-wise either. Ryubokushihai is the best Dragonic Thunder ever printed, and they get Dragonic Grimoire and Abyss Symphony clones in Tome of Judgement and Akishoki. Starved Yamigedo is a great gauge ramp card that offers the Yamigedo tank deck a better gauge ramp option than Harpy (and the synergy with Narukami is wicked since Narukami destroys a monster). Yamitagae is a solid counter negate that can be used in all circumstances if you have a weapon.
The most interesting spell in question is Odd Ritual, Skull Festival. Now, this card specifically only targets Skull Warriors but unlike the other trait-based effects this one is actually good. This is because all the Skull Warriors that are also Hundred Demons are all good. You can call Kalavinka for free, you can call the Size 0, there's also a Size 1 target...and you can use Thunderclap, Goraiko's on-play deal 1 damage like a spammable ability. It's really not a bad idea to base your deck on Skull Warriors to maximize this Set spell, although you need to balance between the many different good Set spells you have available (Starved, Reinforced, Skull Fest).
Finally, the Impact, Hungry Claw War is pretty good. It's not restricted by life and the requirements are simple - have a monster in center and a weapon equipped. While it has no synergy with Reinforced or Narukami, Hungry Claw War is a pretty good sideboard most decks and works exceptionally well with Yamigedo tank builds.
Ryuzenshakuma is a great addition to the Hundred Demon war machine and helps out a lot of the tanky bodies that Hundred Demon cards naturally have.
 |
| Just keep slashing |
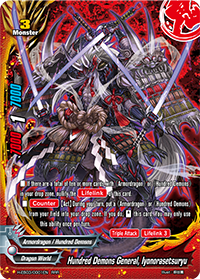
Hundred Extra Booster 3 was created to fully support Hundred Demons as an archetype. I think they may have gone a bit overboard. Hundred Demons was already a powerful archetype before this, but now they have options through the roof. Some are good, some are bad. Take Hundred Demons General, Iyonorasetsuryu. The name is way too long so I'll just call him Dragon Boss. Dragon Boss is a good card - he has 7000 defense, Triple Attack, and his Lifelink might as well not be printed since getting 10 Hundred Demon cards in the drop zone is just getting 10 cards in the drop zone. Most importantly, this card costs no gauge. That's pretty ridiculous. He deals 3 damage in hard to block instances and doesn't cost resources. His Counter ability to restand by sacking Armordragons or Hundred Demons is also very applicable. In Dragon World this is pretty hard to pull off, but Hundred Demons has revivable Size 0s and Set spells that can be sacked for that extra push.
 |
| The dead shall walk again |
On the other hand, Hundred Demons General, Gishingyuki is not as great. Skull Boss is 10000/2/5000 with Double Attack for 2 gauge, which more or less works out mathematically except 5000 defense is dangerous. What makes Gishingyuki unique is its ability to revive from the drop. However, the cost is pretty heavy, requiring 1 life and sacking your own monster. And you still have to pay the 2 gauge call cost. Essentially, you're paying 1 life to transform whatever monster you were using before into Gishingyuki. I suppose this is pretty useful in the lategame, when Gishingyuki's ability to pump 4 damage to face becomes supremely relevant. But early on, reviving him doesn't grant any bonuses and in both Hundred Demons and Skull Warriors you're better off playing swarm games (or use better, tankier Size 3s). Definitely a less useful tech, but one with its own role.
 |
| Air strike |
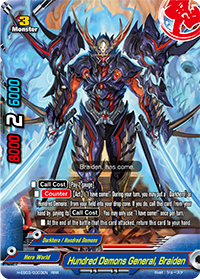
But if we're going to talk about extremely situational cards, nothing fits the bill better than Hundred Demons General, Braiden. Hero Boss is a pretty whatever 8000/2/6000 for 2 gauge Size 3 that doesn't even have Penetrate or Double Attack. We're talking seriously overcosted here, about -1.5 in advantage. What makes Braiden special? Well, you can actually Counter call him by sacking a Darkhero or Hundred Demon card on your field. You still pay the call cost, so it's now a -2.5 for flash timing. Never underestimate flash timing though. If you -2.5 but win off the 2 extra damage, that's a -2.5 well worth it. When he comes into play, chances are he can also bring Nebatt along with him for an extra attack. Otherwise? This card is pretty much dead weight. You might as well run Impacts if you want extra damage.
The most interesting thing about these three, however, is the fact that they can sack any card with Hundred Demon as payment for their effects. In their respective worlds, they usually have to sack monsters but Hundred Demon decks allow them to sack spells, items, anything in play. You can turn a Starving Yamigedo into a Gishingyuki or a Reinforced Formation into a 2-damage Braiden strike. This multi-conversion of resources and card types is definitely what allows these cards to be used to full potential.
 |
| This is the door to Tartarus |
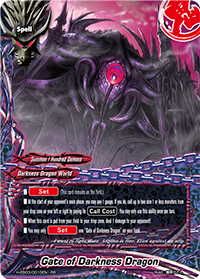
As if Bushiroad really wanted to underline this flexibility and possibility, they've introduced three new Set cards that have effects when they're sacked. It's literally asking you to sack them. But they have other effects to, and I don't see how Bushiroad can pump all the broken effects onto the same cards and still get away with it. Gate of Darkness Dragon is horrifically undercosted for every letter written in the effect. You can pay 1 gauge to call up to 2 Size 1 or lower monsters from your drop zone, one to either side. In other words, pay 1 to draw 2. They're not even trying to balance this card. Sure, you can only do this on your opponent's turn and at the beginning of their turn, but that means your opponent needs to waste attacks and/or removal on the monsters if he or she doesn't want to deal with them defensively. Which is just as good a plus as an attack. Not only that, but if you call monsters with Thunder Mine (and there are some pretty great Thunder Mine cards now) you also force your opponent to take more damage.
And then when you sack it you also deal damage. This card does everything.
 |
| Be chained |
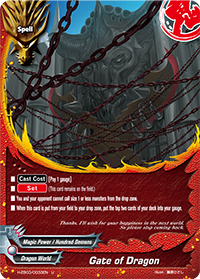
The other two cards are good, but nowhere near as broken as Gate of Darkness Dragon. Gate of Dragon has a set cost, but permanently stops your opponent from reviving Size 1 or lower monsters. That pretty much kills Skull Warriors and revival-based Hundred Demons, so it's a great counter card to have. When you sack it, you can also topgauge 2 which can be useful in clutch situations. The last sackable Set card is Banryufuto. It gives all cards on your left and right +1000/1000, which is very whatever but technically good, especially since setting it doesn't cost gauge. When you sack Banryufuto, you can search your deck for a Size 0 and add it to your hand, so you could technically treat it as a copy of any Size 0 in your deck as long as you run cards that sack Set spells. Normally you don't want to run so many non-monsters, but with stuff like Gishingyuki literally changing those non-monsters into actual monsters the deck works out pretty consistently.
 |
This isn't even my
final form |
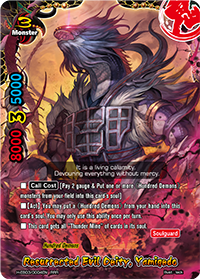
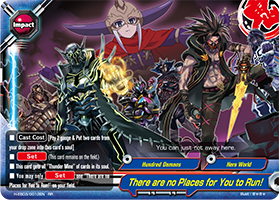
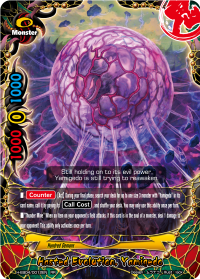
Let's do a quick comparison. Resurrected Evil Deity, Yamigedo vs. There are no Places for You to Run! The former requires 2 gauge to enter the field, and gets its soul as a wash transaction from the number of monsters on your field. Ideally those monsters didn't cost anything to play, but you never know. You can keep adding monsters to Yamigedo's soul every turn. Yamigedo's stats are 8000/3/5000 only which is really subpar, especially defensively, and he doesn't have any extra abilities. On the other hand, the Set Impact also costs 2 gauge to play. On-play, you can add two cards from your drop zone underneath the Impact, so it doesn't cost you on field (but you don't get a monster out of it).
 |
| You can run but...oh wait, you can't |
Both Yamigedo and the Impact have the effect "This card gets all 'Thunder Mine' of cards in its soul". One Thunder Mine by itself doesn't make a big difference, but multiple stacking Thunder Mines starts to become a lot of free damage and a real problem for your opponent. And I think by this point it's pretty obvious that even though this Yamigedo offers the "potential" of infinite Thunder Mine, it's not a realistic situation. After all, not only do you have to minus more for the Yamigedo but you only really have 1 turn of full Thunder Mine capabilities before Yamigedo is mercilessly slaughtered by your opponent's field. 5000 defense is not a lot. You can't protect Yamigedo long enough to really make his Thunder Mine stacking worthwhile. The Impact, on the other hand, is the perfect example of how to set up Thunder Mine: away from the field, where your opponent can't attack it. Maybe you can only get 2 Thunder Mine under each Impact but that's more than enough to really punish your opponent.
 |
Actually not a real card
unless you use one of the
above |
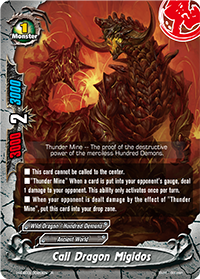
You can take advantage of the really good Thunder Mine monsters like Stranger Dilemma, Armorknight Serpent, and Call Dragon Migidos. You can take advantage of Armorknight Serpent's Thunder Mine without taking up all your size limit and Call Dragon Migidos's Thunder Mine without its downside. The combination of Migidos and Serpent basically forces your opponent to take 2 damage unconditionally every turn, more or less winning the game unless your opponent can answer.
Generally speaking, Thunder Mine is only good the more consistently you have it out, so unless you're reviving it every turn with Reinforced Formation you want it off your monster areas. Luckily, Bushiroad helps you out a bit more with Thunder Mine Stance which effectively doubles your Thunder Mine trapping capabilities. Thunder Mine trap decks are a real threat, though they get shut down by decks that can consistently reduce 1-damage strikes with an equipped Item or something. But of course there's good Item removal in Hundred Demons as well, so this is definitely a viable path to go down.
 |
| Hail Anson |
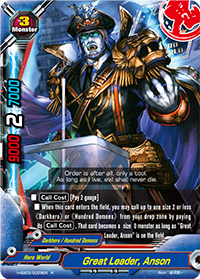
There's one last major combo we need to discuss before we look at Hundred Demons holistically, and that's Great Leader, Anson. This card is ridiculous. His stats are great, 9000/2/7000 is more or less on-par for what we want. You'd expect him to get Double Attack or Penetrate or something but instead he can revive a Size 2 or lower Darkhero or Hundred Demon as a Size 0. You pay the call cost, but since you don't pay anything more it's essentially getting that card for free and undersized. This would be a whatever card if Size 2 wasn't the miracle level. He calls out Cocytus Greed for free. You get Cocytus Greed's on-play effect. You get both Anson and Cocytus on the field for only 1 gauge, plus your opponent is now 1 gauge down.
 |
| Oh never mind he's evil |
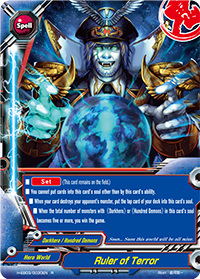
Not related to Anson, but has his big spooky face as the art. Ruler of Terror is Buddyfight's first attempt at an alternative win condition. Bushiroad has only experimented with this once before, and that's with Glendios's Omega Lock. That turned out to be a huge whatever, hard to counter-play but also hard to pull off consistently. Ruler of Terror takes the exact opposite approach.
Instead of dealing damage, you just kill your opponent's monsters with your cards to get soul. This counts removal spells too! Once you get 5 monsters (Darkhero or Hundred Demon) under this card, you win. If you have bad luck you'll soul a bunch of spells or whatnot but you can expect to get the 5 monsters mark by about 7-8 soul. Of course, depending on what kind of deck you're against it might be faster to just hit face, but in the right matchup this is a good pressure card, forcing your opponent to deal with 2 ticking clocks (their life and their field). Your opponent could always try to remove it, but you didn't pay anything extra to set this card in the first place so that's an overall win for you.
 |
| Creepy bug shield |
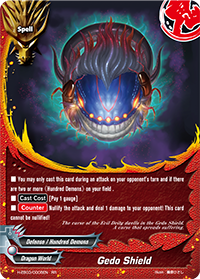
With new weapon options, Gedo Shield, and really cool options like Armorknight Tiger "A" and King of General Knowledge, Furcas, Hundred Demons are definitely top-tier material and dangerously flexible. Most builds that were put together by people with more than half a brain should work. If you want a weapon-focused deck, you can give any of your 8 3-crit weapons (4 Blackknuckle 4 Narukami) Double Attack and still use Reinforced Formation to cover your center afterwards. If you want to ping people with Unlimited Thunder Mine Works, there are 4 abusable Set cards (Reinforced Formation, Gate of Darkness Dragon, Thunder Mine Stance, the Impact) alongside 3 abusable monsters (Revived Yamigedo, Furcas, Nightmare Scream Dragon) and some ridiculously good Thunder Mine effects to use them with. Nightmare Scream Dragon also works well with Ultimate Buddy.
If you want to play the Size 3 tank game, we have the three generals and Yamigedo to get you started. Lindwurm gives them Move and there's 12 reliable protection spells to boot (counting Scorn of Gremlin), alongside 4 Dragoenergy clones. There's a lot of Size 0s to bolster your field and Evil Deity Altar is actually insane, recycling your Size 3's like they were plastic bottles. Gishingyuki also guarantees that you will never not have a Size 3 in play. You have spells that take advantage of Counter timings, cards that can be teched against very specific matchups, and the whole gambit of good support.
 |
| Yo dawg! |
The most important card released with H-BT03 is the new Impact, Shoraiabare Kandachi. I'm not going to remember that name and neither should you, so we'll officially call it "that OP Hundred Demons Impact". For 3 gauge you can destroy cards and deal damage equal to X, where X is the number of Thunder Mine on cards in your drop zone. Yeah, it's pretty insane. Especially when cards like Zein Blestand are worth 2 Thunder Mine. Lategame, this Impact alone can easily 1-shot an opponent. And even used early, it packs enough destruction to reliably neuter your opponent's strategies and advantages. Disgusting.
Thunder Mine seems to be the way to go, then (of course, all builds utilize monsters with Thunder Mine so all can reliably use the Impact). Cool, because there's more support for them. Size 0 Thunder Miner that deals damage when your opponent takes damage from Thunder Mine. The memes. I herd you liek Thunder Mines? So I put a Thunder Mine on your Thunder Mine so you can take 1 damage while you take 1 damage.
And then lose a Size 1 monster. And then another.
Yamigedo just keeps getting new forms, it's hard to remember them all. This one is meaningful because it has good defense (7000) without compromising a good Thunder Mine or a good ability. Granted, Double Attack is better than Penetrate in almost every situation but Penetrate is still passable. With this Yami and the original Yami, you're looking at 8 good boss monsters with relevant pressuring effects.
 |
| When it hatches we lose |
More Yamigedo support. Was anybody surprised? Like they're really in a hurry to get Yamigedo onto the field that they even have this hasted evolution card that, surprise, gets Yamigedo onto the field faster. It's a Size 0 that has virtually no stats (but it can kill some things) that can change into a Yamigedo from deck. That Yamigedo is called with call cost and all meaning it can eat Hasted Evolution for soul. Nom nom nom. When Hasted Evolution is in the soul of a monster, its Thunder Mine activates and punishes your opponent every time they try to attack with an Item. Yeah, this is a real effect.
The weirdest thing about Hasted Evolution is its really unnecessary synergy with Reinforced Formation. So apparently Bushiroad has ruled that "At the end of your turn" abilities actually activate at the end of Final Phase. So you can call Hasted Evolution with Reinforced Formation and since it's technically still Final Phase and Hasted Evolution's Act is a Counter ability, you can evolve right then and there. So not only do you not have to sacrifice an attacking slot by having Hasted Evolution out during the Battle Phase but you get to do your fancy four attacks with Narukami, revive Hasted and then out comes 3-soul Yamigedo from the deck with tons of stupid Thunder Mine that your opponent has to deal with.
And then they also gave Hundred Demons two spells that gain advantage over turns.
I'd like to remind all of you once again that Bushiroad is a company that sometimes goes insane.
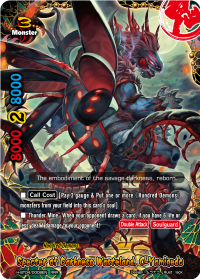
Specter of Darkness Wasteland, O-Yamigedo. If you have 6 life or less and your opponent draws a card, you can deal 1 damage. Every. Single. Time.
Why would you play anything else.
Drawing is mandatory at the start of the game, and charge-and-draw is the only natural resource generation the game gives you. To do both costs your opponent 2 life. Every turn.
Okay, I get it. You want me to play Dragon World, equip one of those cards that reduces damage, and everything's okay. Except its not. Because card games thrive on diverse metagames with multiple decks that have strengths and weaknesses to capitalize on.
This dude only costs 1 more gauge than the original Yamigedo, lost no stats for it and still has Double Attack.
It might sound like I'm just complaining, but this card feels really degenerate. It feels like a Fevered Visions deck gone out of control. And I think punishing card draw is pretty unfair, since good decks want to draw cards and stuff. I guess it doesn't counter searching or salvaging, so that's cool.
- updated to H-BT04, CP01, H-EB04, H-TD02, H-PP01 -
All images were used obtained from the official Bushiroad website and used here solely for reference purposes. Future Card Buddyfight!, logos, and respective content belong to Bushiroad. Large images belong to the Buddyfight! Wikia.

...
ReplyDelete....
.......
Still waiting for reviews about the synergies of these Demons in their own respective worlds...
Dekalfar Demon Swordsman, Heim deserves more mention, he makes Orthus and Gata both super abusable and is the main combo of my deck... Reinforced + Heim, ramping with Odd bird harpy for the guage. i just charge Heim if i get him early, get him back from the guage after I normal summon gata or orthus (and after they die). some weird combos are calling heim with the set spell, then calling the size 2 over him to make sure he goes back to drop...
ReplyDeletealso, the Impact has great synergy with Reinforced, just not with Narukami so much. the set spell guarantees you always have a center monster, now all you need is a weapon other than Narukami.
DeleteNot true. You can't cast the Impact after Reinforced, since Reinforced activates at the end of your turn.
DeleteI just mean it helps you keep a center monster :D you're right about it activating at end of turn though.
Deleteon second thought, you're right Blaise it doesn't have good synergy. :P I remember getting confused when i had all three in my hand because of that end of turn timming and impact phase >.<
DeleteWhat is fun about Hundred Demons is that they actually act like a mini-subclan for their respective worlds, I believe that when you plan a Hundred Demons Deck, you actually have to choose a "Main" world to build around. for example my current deck based mainly from TD parts is actually centered around Legend World, because my main combo is Heim, I put a lot of size 2 Legend Worlds in like Gata, Orthus and Tallos (free 3 crit). though lately i took a few Tallos out for more Gran. conversely you could actually build a Legend World deck that is actually Hundred Demons based (Wydar Sarkal), same abuse of Heim but no set spell, but Gata works cuz of the many HD size 1s now available, a lot of whom are also wydar. you could also make DDW-HD with Goku as the main tank, with the spells, weapon, impact, and size 1 (promocard) all to make his soul cost viable. lately I've been thinking of Dungeon World based HD, Goku + Red Arrogant and the size 0 dragon tooth along with Mad. because a lot of the HD are strong in their own right, most can do well in their own decks, like BRAINBALTES, my friend made a DW deck based on baltes size 1's and the size 3, with other spells and monsters to support them. Hundred Demons really make the game more interesting, each world getting more options. really happy with what Bushi did this time.
ReplyDeleteNothing to say on these bad boys, Blaise? Even if not on the Hundred Demons page, perhaps in their own attributes?
ReplyDeletehttp://buddyfight.wikia.com/wiki/Dark_Dragon,_Demochill
This guy makes no Size 3 Ancient World so much better. 8k center defense banzai!
Also, I think you should mention Starved Yamigedo in the Danger World article, even if only because it's such a good gauge card.
Reinforced Formation of Hundred Demons costs 1 gauge to set. Its ability doesn't cost anything.
ReplyDelete1 gauge for (1 crit every turn)
DeleteSorry, ambiguous phase
Oh, never mind then.
DeleteThe problem with Ruler of Terror is that the cards in it have to be monsters to win, but it still causes your opponent to make bad plays when combined with all that thunder mine
ReplyDeleteIn a Hundred Demon's deck, all cards are hundred demons so its win condition is still when it has 5 soul(Unless omni-lords pop up). Also, even though the additional win condition may be bothersome, only amateurs will make "bad-plays". After all, the alternate win condition is completely separate from it's normal play-style, of *pinging*, your opponent slowly to death. With better players, they will unlikely be place in between both lose conditions throughout the game, and even if they were, the moves they make will be one of their best possible move with their limited resources.
DeleteUh, no it isn't, Hibiki. Terror needs five or more Darkhero/HD MONSTERS. Which means on average about half of the cards being sent to its soul will not count towards the condition. Meaning you actually need 10 kills to get it off.
DeleteSorry my bad, didn't read the part before the brackets. But on the other hand, you need to consider the fact that destroying monsters are a better play than going for damage. They lose valuable resource when you do. Also, since Terror activates via destruction, battle or effect, this will be full of soul in a couple of turns. The win condition is much more fair than I originally thought, (again, my bad) however it does not lose its charm as an alternate win card.
DeleteTotally my bad for missing that. I've fixed the part in the article regarding Ruler of Terror. The math says that you'll get 5 monsters by about 7-8 cards on average, but you know how card games work (or rather, not work).
DeleteThis comment has been removed by the author.
ReplyDeleteShoraiabare Kandachi doesn't actually work that way, it doesn't deal X dmg for each monster with thundermine in your drop zone... "Choose cards on your opponent's field equal to the number of cards in your drop zone with "Thunder Mine". Destroy the chosen cards and deal damage to your opponent equal to the number of cards destroyed!!" it actually only deals dmg equal to the number of Cards destroyed, its not OP, unless the enemy has a full field with set spells, you will deal around 3 dmg only no matter how many thundermines are in your drop, its something the opponent can control if he doesn't commit to a large set field the dmg isnt that high.
ReplyDeleteBlaise,Specter Of darkness wasteland O yamigedo is out and it's thundermine activate when your opponent draw a card
ReplyDeleteAnd it activates whwn you have 6 life or less
DeleteHmmm, is there any chance that the Yamigedo secret pack can be mentioned in this article?
ReplyDelete